Description: This guide will show you how to integrate and configure OpenLDAP into OIM. The Oracle Internet Directory (OID) connector is utilized for the integration. The OID connector uses Identity Connector Framework (ICF).
Prerequisites
- OpenLDAP needs to be installed. This guide assumes OpenLDAP is installed on the local machine. The OpenLDAP installation guide can be found here.
- OIM 11.1.1.5.3 or later is required. Click here for guide.
Link: http://www.oracle.com/technetwork/middleware/id-mgmt/downloads/connectors-101674.html
Name: Oracle Internet Directory Version: 11.1.1.5.0
File: OID-11.1.1.5.0.zip
Installing the Connector in OIM
- Unpack "OID-11.1.1.5.0.zip" by executing the following command:
unzip OID-11.1.1.5.0.zip
- Move "OID-11.1.1.5.0" folder into "OIM_HOME/server/ConnectorDefaultDirectory/"
mv OID-11.1.1.5.0/ /home/oracle/Oracle/Middleware/Oracle_IDM1/server/ConnectorDefaultDirectory/
- Login to the OIM console and install "ODSEE/OUD/LDAPV3 Connector 11.1.1.5.0". The screenshots given below demonstrates this procedure.
Step 1: Log in to OIM Console

Step 2: Click Advanced

Step 3: Select Manage Connector

Step 4: Click Install

Step 5: Select Connector and Load

Step 6

Step 7: Make sure everything is successful
Creating IT Resource for OpenLDAP
- In the OIM console, navigate to Advanced -> Create IT Resource under Configuration
- Specify connection parameters according to your OpenLDAP environment.
 IT Resource Name: OpenLDAP
 IT Resource Type: LDAP
 Configuration Lookup: Lookup.LDAP.Configuration
 Connector Server Name:
 baseContexts: "dc=my-domain,dc=com"
 credentials: <Password for principal>
 failover:
 host: localhost
 port: 389
 principal: cn=Manager,dc=my-domain,dc=com
 ssl: false
- Click continue for the other steps. The screenshots given below demonstrates this process.

Step 1: Select Create IT Resource

Step 2:
IT Resource Name: OpenLDAP
IT Resource Type: LDAP

Step 3: Configuration

Step 4: Role Access Permission
Configuring the "Lookup.LDAP.Configuration" Lookup
- Login to Design Console.
cd /home/oracle/Oracle/Middleware/Oracle_IDM1/designconsole/
./xlclient.sh
- Navigate to Administration -> Lookup Definition.
- Type "Lookup.LDAP.Configuration" in the Code field. Then click the search button, which is the binoculars icon.
- Look for the Code Key "uidAttribute" and change its decode value to "entryUUID".
- If you do not have the "inetOrgPerson" object defined in OpenLDAP, look for the Code Key "accountObjectClasses" and substitute "inetOrgPerson" with "uidObject".
- The screenshots given below demonstrates this procedure.

Step 1: Log in to Design Console

Step 2: Click Administration

Step 3: Click Lookup Definition

Step 4: Query for Lookup.LDAP.Configuration

Default value for uidAttribute

Step 5: Change value for uidAttribute to entryUUID

Default Values for accountObjectClasses

Step 6: Modify to include you target system Account Object Classes
Validating the Functionality of the Connector
- In the OIM console, navigate to Advanced -> Search Schedule Job
- Look for "LDAP Connector OU Lookup Reconciliation" and change the IT Resource Name to "OpenLDAP". Then run the schedule task. This should bring in all the organization units.
- Login to Design Console and make sure "Lookup.LDAP.Organization" is populated with the organization units in OpenLDAP.
- To validate provisioning, create a user and give that user a OpenLDAP resource. Make sure resource status is "Provisioned" and check in OpenLDAP that the account got created.
- To validate reconciliation, run the "LDAP Connector User Search Reconciliation". Make sure to change the IT Resource Name to OpenLDAP. Check if an event is generated for the reconciliation.

Step 1: Click Search Scheduled Jobs

Step 2: Query for Scheduled Jobs

Step 3: Select LDAP Connector OU Lookup Reconciliation

Step 4: Change IT Resource Name
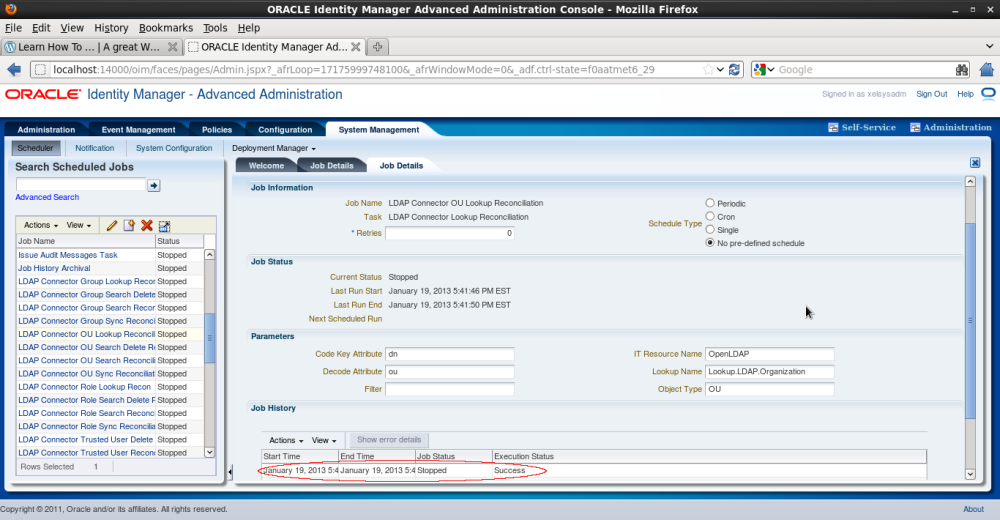
Step 5: Run reconciliation

Step 6: Validate OU Reconciliation

Step 7: Test Provisioning with new user

Step 8: Click User Resources

Step 9: Click Add

Step 10: Add OpenLDAP Resource for User

Step 11: Continue

Step 12: Specify information to create target account

Step 13: LDAP Groups

Step 14: LDAP User Role

Step 15: Summary

Step 16: Provisioned Initiated

Step 17: Click Refresh

Step 18: User Resources

Step 19: Validate Target System if user is created

Step 20: Test Target User Reconciliation.
Change IT Resource Name and click Run.

Step 21: Select Event Management and Query for Reconciliation Events

Step 22: Validate Reconciliation Events were created
Hi
ReplyDeleteCan you please tell me how to integrate OIM with Embedded Weblogic LDAP
When Running the "LDAP Connector OU Lookup Reconciliation" job then getting below error-
ReplyDeleteorg.identityconnectors.framework.common.exceptions.ConnectorException: No attribute named entryUUID found in entry
Please help if any idea about this error.
Hi Singh,
Deletewere you able to resolve the issue. I am also facing the same issue.
Thanks