Tuesday, December 11, 2012

SOA 11.1.1.5.0 Installation on OEL 6.3 (64-bit)

Installation Prerequisites
  1. Environment Setup
  2. Java Installation
  3. WebLogic 10.3.5.0 Server Installation
SOA Installation
Oracle SOA Suite 11.1.1.5.0 Download
Files:
  • ofm_soa_generic_11.1.1.5.0_disk1_1of2.zip
  • ofm_soa_generic_11.1.1.5.0_disk1_2of2.zip

Unzip the files. Five "Disk" directory should have been created for you. Move those directories into a directory called "SOA".

Modify the "refhost.xml" located in the "SOA/Disk1/stage/prereq/linux64" directory.
Add the following lines to the "refhost.xml" below the "<CERTIFIED_SYSTEMS>" tag:

<OPERATING_SYSTEM>
<VERSION VALUE="6.3"/>
<ARCHITECTURE VALUE="x86"/>
<NAME VALUE="Linux"/>
<VENDOR VALUE="redhat"/> 
<GLIBC ATLEAST="2.5-12"> </GLIBC>
<PACKAGES>
<PACKAGE NAME="binutils" VERSION="2.17.50.0.6" /> 
<PACKAGE NAME="compat-libstdc++-33" VERSION="3.2.3" ARCHITECTURE="x86_64" /> 
<PACKAGE NAME="compat-libstdc++-33" VERSION="3.2.3" ARCHITECTURE="i686" /> 
<PACKAGE NAME="elfutils-libelf" VERSION="0.125" /> 
<PACKAGE NAME="elfutils-libelf-devel" VERSION="0.125" />
<PACKAGE NAME="gcc" VERSION="4.1.1" /> 
<PACKAGE NAME="gcc-c++" VERSION="4.1.1" />
<PACKAGE NAME="glibc" VERSION="2.5-12" ARCHITECTURE="x86_64" /> 
<PACKAGE NAME="glibc" VERSION="2.5-12" ARCHITECTURE="i686" /> 
<PACKAGE NAME="glibc-common" VERSION="2.5" /> 
<PACKAGE NAME="glibc-devel" VERSION="2.5" ARCHITECTURE="x86_64" /> 
<PACKAGE NAME="glibc-devel" VERSION="2.5-12" ARCHITECTURE="i686" /> 
<PACKAGE NAME="libaio" VERSION="0.3.106" ARCHITECTURE="x86_64" /> 
<PACKAGE NAME="libaio" VERSION="0.3.106" ARCHITECTURE="i686" /> 
<PACKAGE NAME="libaio-devel" VERSION="0.3.106" /> 
<PACKAGE NAME="libgcc" VERSION="4.1.1" ARCHITECTURE="x86_64" /> 
<PACKAGE NAME="libgcc" VERSION="4.1.1" ARCHITECTURE="i686" /> 
<PACKAGE NAME="libstdc++" VERSION="4.1.1" ARCHITECTURE="x86_64" /> 
<PACKAGE NAME="libstdc++" VERSION="4.1.1" ARCHITECTURE="i686" /> 
<PACKAGE NAME="libstdc++-devel" VERSION="4.1.1" /> 
<PACKAGE NAME="make" VERSION="3.81" /> 
<PACKAGE NAME="sysstat" VERSION="7.0.0" /> 
</PACKAGES> 
<KERNEL> 
<!-- 
<PROPERTY NAME="semmsl" NAME2="semmsl2" VALUE="250" />
<PROPERTY NAME="semmns" VALUE="32000" /> 
<PROPERTY NAME="semopm" VALUE="100" /> 
<PROPERTY NAME="semmni" VALUE="128" /> 
<PROPERTY NAME="shmmax" VALUE="536870912" /> 
<PROPERTY NAME="shmmni" VALUE="4096" /> 
<PROPERTY NAME="shmall" VALUE="2097152" /> 
<PROPERTY NAME="file-max" VALUE="65536" /> 
<PROPERTY NAME="ip_local_port_range" ATLEAST="1024" ATMOST="65000" /> 
<PROPERTY NAME="rmem_default" VALUE="4194304" /> 
<PROPERTY NAME="rmem_max" VALUE="4194304" /> 
<PROPERTY NAME="wmem_default" VALUE="262144" /> 
<PROPERTY NAME="wmem_max" VALUE="262144" /> 
--> 
<PROPERTY NAME="VERSION" VALUE="2.6.18"/> 
<PROPERTY NAME="hardnofiles" VALUE="4096"/> 
<PROPERTY NAME="softnofiles" VALUE="4096"/> 
</KERNEL> 
</OPERATING_SYSTEM>

Execute runInstaller located in the "Disk1" directory.
Java Home: /home/oracle/java/jrockit64

The screenshots given below will walk you through the installation process.

Step 1


Step 2


Step 3


Step 4
Oracle Middleware Home: /home/oracle/Oracle/Middleware


Step 5


Step 6


Step 7


Step 8


SOA Installation Response File


SOA Installation Configuration File

Monday, December 10, 2012

Oracle IDM 11.1.1.5.0 Installation on OEL 6.3 (64 bit)

Installation Prerequisites
  1. Environment setup
  2. Java Installation
  3. WebLogic Server Installation
IDM Installation
Oracle Identity and Access Management (11.1.1.5.0) download
Type: Generic
File: ofm_iam_generic_11.1.1.5.0_disk1_1of1.zip

Unzip the file. Four "Disk" directories should have been created. Move those directories in one directory called IDM.

Modify the refhost.xml located in "IDM/Disk1/prereq/linux64" directory.
Below the "<CERTIFIED_SYSTEMS>" tag insert the following lines into the file:
<OPERATING_SYSTEM>
<VERSION VALUE="6.3"/> 
<ARCHITECTURE VALUE="x86"/>
<NAME VALUE="Linux"/>
<VENDOR VALUE="redhat"/>
<GLIBC ATLEAST="2.5-12">
</GLIBC>
<PACKAGES>
<PACKAGE NAME="binutils" VERSION="2.17.50.0.6" />
<PACKAGE NAME="compat-libstdc++-33" VERSION="3.2.3" ARCHITECTURE="x86_64" />
<PACKAGE NAME="compat-libstdc++-33" VERSION="3.2.3" ARCHITECTURE="i686" />
<PACKAGE NAME="elfutils-libelf" VERSION="0.125" />
<PACKAGE NAME="elfutils-libelf-devel" VERSION="0.125" />
<PACKAGE NAME="gcc" VERSION="4.1.1" />
<PACKAGE NAME="gcc-c++" VERSION="4.1.1" />
<PACKAGE NAME="glibc" VERSION="2.5-12" ARCHITECTURE="x86_64" />
<PACKAGE NAME="glibc" VERSION="2.5-12" ARCHITECTURE="i686" />
<PACKAGE NAME="glibc-common" VERSION="2.5" />
<PACKAGE NAME="glibc-devel" VERSION="2.5" ARCHITECTURE="x86_64" />
<PACKAGE NAME="glibc-devel" VERSION="2.5-12" ARCHITECTURE="i686" />
<PACKAGE NAME="libaio" VERSION="0.3.106" ARCHITECTURE="x86_64" />
<PACKAGE NAME="libaio" VERSION="0.3.106" ARCHITECTURE="i686" />
<PACKAGE NAME="libaio-devel" VERSION="0.3.106" />
<PACKAGE NAME="libgcc" VERSION="4.1.1" ARCHITECTURE="x86_64" />
<PACKAGE NAME="libgcc" VERSION="4.1.1" ARCHITECTURE="i686" />
<PACKAGE NAME="libstdc++" VERSION="4.1.1" ARCHITECTURE="x86_64" />
<PACKAGE NAME="libstdc++" VERSION="4.1.1" ARCHITECTURE="i686" />
<PACKAGE NAME="libstdc++-devel" VERSION="4.1.1" />
<PACKAGE NAME="make" VERSION="3.81" />
<PACKAGE NAME="sysstat" VERSION="7.0.0" />
</PACKAGES>
<KERNEL>
<!--
<PROPERTY NAME="semmsl" NAME2="semmsl2" VALUE="250" />
<PROPERTY NAME="semmns" VALUE="32000" />
<PROPERTY NAME="semopm" VALUE="100" />
<PROPERTY NAME="semmni" VALUE="128" />
<PROPERTY NAME="shmmax" VALUE="536870912" />
<PROPERTY NAME="shmmni" VALUE="4096" />
<PROPERTY NAME="shmall" VALUE="2097152" />
<PROPERTY NAME="file-max" VALUE="65536" />
<PROPERTY NAME="ip_local_port_range" ATLEAST="1024" ATMOST="65000" />
<PROPERTY NAME="rmem_default" VALUE="4194304" />
<PROPERTY NAME="rmem_max" VALUE="4194304" />
<PROPERTY NAME="wmem_default" VALUE="262144" />
<PROPERTY NAME="wmem_max" VALUE="262144" />
-->
<PROPERTY NAME="VERSION" VALUE="2.6.18"/>
<PROPERTY NAME="hardnofiles" VALUE="4096"/>
<PROPERTY NAME="softnofiles" VALUE="4096"/>
</KERNEL>
</OPERATING_SYSTEM>

Install the required packages:
yum install glibc-devel.i686
Execute the "runInstaller" script found in "Disk1" directory. You will be prompted to specify Java home (E.g. /home/oracle/java/jrockit64).

The screenshots given below will walk you through the installation process.

Step 1


Step 2


Step 3


Step 4
Oracle Middleware Home: /home/oracle/Oracle/Middleware


Step 5
Save Response File


Step 6


Step 7
Save Installation Configuration


IDM Installation Response File


IDM Installation Configuration File

Weblogic 10.3.5.0 Installation on OEL 6.3 (64-bit)

Installation Prerequisites:
  1. Environment Setup
  2. Java Installation
WebLogic Server Installation
WebLogic 10.3.5.0 Download Link
Oracle WebLogic Server 11gR1 (10.3.5.0) + Coherence Package Installer: Generic
File: wls1035_generic.jar

Execute the weblogic jar file.
java -jar wls1035_generic.jar

The screenshots given below will walk you through the installation process.

This is the welcome page of the installation wizard. Click next.
Step 1


Specify the Middleware directory to install weblogic in and then click next.
Step 2
Middleware Home Directory: /home/oracle/Oracle/Middleware


This is not required to register for security updates. Opt out of the security updates and then click next.
Step 3: Uncheck “I wish to receive …”


Bypass the security updates.
Step 3.1: Click yes.


You get this warning when you do not enter your email address in the security updates page. It is okay to ignore this message.
Step 3.2: Click yes.


This message does not affect installation. Select "I wish to remain uninformed of security issues in my configuration" and then click next.
Step 3.3: Check “I wish to remain . . .” and click continue


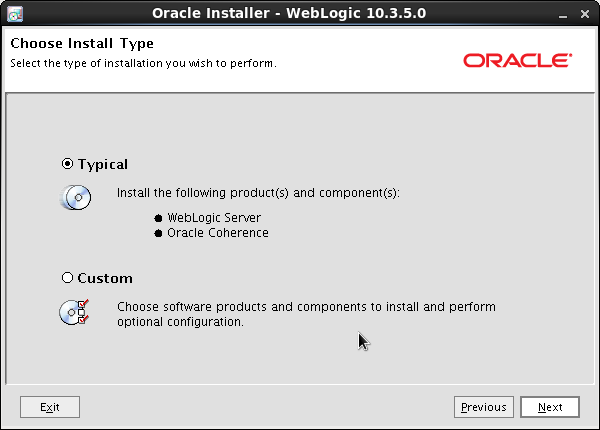
Select typical install type.
Step 4: Select Typical


Specify the location of the JRockit directory.
Step 5


Leave the fields as the default values,
Step 6


This shows the following products to be installed.
Step 7


The installation should be quick.
Step 8


Do not run quick start. Click finish.
Step 9

Friday, November 23, 2012

Oracle Database 11g R2 Installation on Oracle Linux 6.3 (64-bit)

Installation Prerequisites: Environment Setup
Download Link: http://www.oracle.com/technetwork/database/enterprise-edition/downloads/index.html

Files:
  • linux.x64_11gR2_database_1of2.zip
  • linux.x64_11gR2_database_2of2.zip
After unpacking the two zip files, a directory called "database" should be created. This directory should contain the contents of the two files mentioned above.

Installation Process
Modify the "cvu_prereq.xml" file located in "database/stage/cvu" directory. Find "<operating_system release="OEL4">" and make the following changes:
  • In the "packages" tag, change i386 to i686.
  • Comment out "<PACKAGE NAME="pdksh" VALUE="5.2.14" SEVERITY="IGNORABLE"/>" and add "<PACKAGE NAME="ksh" VALUE="20060214" SEVERITY="IGNORABLE"/>".
  • Below is what your OEL section should look like:
<OPERATING_SYSTEM RELEASE="OEL4">
<VERSION VALUE="3"/>
<ARCHITECTURE VALUE="x86_64"/>
<NAME VALUE="Linux"/>
<VENDOR VALUE="enterprise"/>
<KERNEL_VER VALUE="2.6.9"/>
<KERNEL>
<PROPERTY NAME="semmsl" NAME2="semmsl2" VALUE="250" SEVERITY="IGNORABLE"/>
<PROPERTY NAME="semmns" VALUE="32000" SEVERITY="IGNORABLE"/>
<PROPERTY NAME="semopm" VALUE="100" SEVERITY="IGNORABLE"/>
<PROPERTY NAME="semmni" VALUE="128" SEVERITY="IGNORABLE"/>
<PROPERTY NAME="shmmax" VALUE="536870912" SEVERITY="IGNORABLE"/>
<!-- for shmmax we can have a STEP structure similar to SWAP -->
<PROPERTY NAME="shmmni" VALUE="4096" SEVERITY="IGNORABLE"/>
<PROPERTY NAME="shmall" VALUE="2097152" SEVERITY="IGNORABLE"/>
<PROPERTY NAME="file-max" VALUE="6815744" SEVERITY="IGNORABLE"/>
<PROPERTY NAME="ip_local_port_range" ATLEAST="9000" ATMOST="65500" SEVERITY="IGNORABLE"/>
<PROPERTY NAME="rmem_default" VALUE="262144" SEVERITY="IGNORABLE"/>
<PROPERTY NAME="rmem_max" VALUE="4194304" SEVERITY="IGNORABLE"/>
<PROPERTY NAME="wmem_default" VALUE="262144" SEVERITY="IGNORABLE"/>
<PROPERTY NAME="wmem_max" VALUE="1048576" SEVERITY="IGNORABLE"/>
<PROPERTY NAME="aio-max-nr" VALUE="1048576" SEVERITY="IGNORABLE"/>
</KERNEL>
<PACKAGES>
<!-- Packages for ASM -->
<CONDITION VAR="ASM">
<!-- Need to confirm version for following ASM packages -->
<PACKAGE NAME="oracleasm-support" VALUE="2.0"  SEVERITY="IGNORABLE"/>
<PACKAGE NAME="oracleasm-%KERNEL_RELEASE%" VALUE="2.0"  SEVERITY="IGNORABLE"/>
<PACKAGE NAME="oracleasmlib" VALUE="2.0"  SEVERITY="IGNORABLE"/>
</CONDITION>
<!-- Packages for OCFS2 -->
<CONDITION VAR="OCFS2">
<PACKAGE VAR="ocfs2" VALUE="1.2.9" SEVERITY="IGNORABLE"/>
<PACKAGE NAME="ocfs2-tools" VALUE="1.2.7" SEVERITY="IGNORABLE"/>
</CONDITION>
<PACKAGE NAME="make" VALUE="3.80" SEVERITY="IGNORABLE"/>
<PACKAGE NAME="binutils" VALUE="2.15.92.0.2" SEVERITY="IGNORABLE"/>
<PACKAGE NAME="gcc" VALUE="3.4.6" SEVERITY="IGNORABLE"/>
<PACKAGE NAME="libaio" VALUE="0.3.105" SEVERITY="IGNORABLE" ARCHITECTURE="i686"/>
<PACKAGE NAME="libaio" VALUE="0.3.105" SEVERITY="IGNORABLE" ARCHITECTURE="x86_64"/>
<PACKAGE NAME="glibc" VALUE="2.3.4-2.41" SEVERITY="CRITICAL" ARCHITECTURE="i686"/>
<PACKAGE NAME="glibc" VALUE="2.3.4-2.41" SEVERITY="CRITICAL" ARCHITECTURE="x86_64"/>
<PACKAGE NAME="compat-libstdc++-33" VALUE="3.2.3" SEVERITY="IGNORABLE" ARCHITECTURE="i686"/>
<PACKAGE NAME="compat-libstdc++-33" VALUE="3.2.3" SEVERITY="IGNORABLE" ARCHITECTURE="x86_64"/>
<PACKAGE NAME="elfutils-libelf" VALUE="0.97" SEVERITY="IGNORABLE" ARCHITECTURE="x86_64"/>
<PACKAGE NAME="elfutils-libelf-devel" VALUE="0.97" SEVERITY="IGNORABLE"/>
<PACKAGE NAME="glibc-common" VALUE="2.3.4" SEVERITY="IGNORABLE"/>
<PACKAGE NAME="glibc-devel" VALUE="2.3.4" SEVERITY="IGNORABLE" ARCHITECTURE="x86_64"/>
<PACKAGE NAME="glibc-headers" VALUE="2.3.4" SEVERITY="IGNORABLE"/>
<PACKAGE NAME="gcc-c++" VALUE="3.4.6" SEVERITY="IGNORABLE"/>
<PACKAGE NAME="libaio-devel" VALUE="0.3.105" SEVERITY="IGNORABLE" ARCHITECTURE="i686"/>
<PACKAGE NAME="libaio-devel" VALUE="0.3.105" SEVERITY="IGNORABLE" ARCHITECTURE="x86_64"/>
<PACKAGE NAME="libgcc" VALUE="3.4.6" SEVERITY="IGNORABLE" ARCHITECTURE="i686"/>
<PACKAGE NAME="libgcc" VALUE="3.4.6" SEVERITY="IGNORABLE" ARCHITECTURE="x86_64"/>
<PACKAGE NAME="libstdc++" VALUE="3.4.6" SEVERITY="IGNORABLE" ARCHITECTURE="i686"/>
<PACKAGE NAME="libstdc++" VALUE="3.4.6" SEVERITY="IGNORABLE" ARCHITECTURE="x86_64"/>
<PACKAGE NAME="libstdc++-devel" VALUE="3.4.6" SEVERITY="IGNORABLE" ARCHITECTURE="x86_64"/>
<PACKAGE NAME="sysstat" VALUE="5.0.5" SEVERITY="IGNORABLE"/>
<PACKAGE NAME="unixODBC" VALUE="2.2.11" SEVERITY="IGNORABLE" ARCHITECTURE="i686"/>
<PACKAGE NAME="unixODBC" VALUE="2.2.11" SEVERITY="IGNORABLE" ARCHITECTURE="x86_64"/>
<PACKAGE NAME="unixODBC-devel" VALUE="2.2.11" SEVERITY="IGNORABLE" ARCHITECTURE="i686"/>
<PACKAGE NAME="unixODBC-devel" VALUE="2.2.11" SEVERITY="IGNORABLE" ARCHITECTURE="x86_64"/>
<!--<PACKAGE NAME="pdksh" VALUE="5.2.14" SEVERITY="IGNORABLE"/>-->
<PACKAGE NAME="ksh" VALUE="20060214" SEVERITY="IGNORABLE"/>
<PACKAGE NAME="expat" VALUE="1.95.7" SEVERITY="IGNORABLE" ARCHITECTURE="x86_64"/>
</PACKAGES>
<SYSTEM_FILES>
<DHCP FILENAME="/etc/network_sysconfig"/>
</SYSTEM_FILES>

Modify the “/etc/security/limits.conf” file to include the following information:
*       hard    nofile  65536
*       hard    nproc   16384
*       soft    nproc   2047

Modify the “/etc/sysctl.conf” file to include the following information:
kernel.sem = 250 32000 100 128
fs.file-max = 6815744
net.ipv4.ip_local_port_range = 9000 65500
net.core.rmem_default = 262144
net.core.rmem_max = 4194304
net.core.wmem_default = 262144
net.core.wmem_max = 1048586
fs.aio-max-nr = 1048576

Execute the following command to load the kernel parameters:
sudo sysctl -p

Execute the following command to install the missing packages:
sudo yum install compat-libstdc++-33 elfutils-libelf-devel gcc-c++ unixODBC unixODBC-devel libaio-devel compat-libstdc++-33.i686 libstdc++.i686 libaio-devel.i686 libaio.i686 unixODBC.i686 unixODBC-devel.i686 ksh

Execute "runInstaller" located in the "database" directory. Run command as the "oracle" user.
./runInstaller

The screenshots given below will walk you through the installation process only for "Desktop Class" system.

This is step 1 of 9. Uncheck "I wish to recieve security updates via My Oracle Support" and click next.
Step 1: Skip updates and click next.


This warns you that you will remain uninformed of critical security issues in your configuration. This should not affect installation if you bypass it.
Step 1.1: Click "yes".


Create and configure a database. This option will setup everything for you to get your database up.
Step 2: Select “Create and configure a database”.


Select desktop class. This option is recommended if you are installing on a laptop or desktop class system. This option includes a starter database and allows minimal configuration.
Step 3: Select Desktop Class.


Specify the location of your database installation. Make sure to select the enterprise edition. The character set must be unicode (AL32UTF8).
Step 4:
Oracle base: /home/oracle/db/app/oracle
Software location: /home/oracle/db/app/oracle/product/11.2.0/dbhome_1
Database file location: /home/oracle/db/app/oracle/oradata
Database edition: Enterprise Edition (4.29GB)
Character Set: Unicode (AL32UTF8)
OSDBA Group: oracle
Global database name: orcl


Specify directory for installation files. The installer automatically sets up subdirectories for each product to contain inventory data.
Step 5: 
Inventory Directory: /home/oracle/db/app/oraInventory
oraInventory Group Name: oracle


This performs prerequisite checks on your environment to see if the necessary critera are met for the database installation.
Step 6


This is a summary of all the configurations you have made during installation.
Step 7: Save Response File and then continue.


The database installation might take a while.
Step 8


This configures your database. This must complete successfully in order for your database to be healthy.
Step 8.1


Select password management in order to set up your password for the database administrator user.
Step 8.2: Click Password Management


Set the password for sys and system users. If you do not provide passwords for these users, the password entered during installation will be used for these users.
Step 8.3: If no password are provided, password in step 4 is used.


Execute the scripts mentioned in this screenshot. This set the proper permissions for your database directories.
Step 8.4: Continue after running the scripts.
su root
sh /home/oracle/db/app/oraInventory/orainstRoot.sh
sh /home/oracle/db/app/oracle/product/11.2.0/dbhome_1/root.sh


The summary provides the URL for the database user interface.
Step 9

Post Installation
Oracle Database Enterprise Manager URL
Edit the  “~/.bash_profile” file to include:
ORACLE_HOME=/home/oracle/db/app/oracle/product/11.2.0/dbhome_1
ORACLE_SID=orcl
export ORACLE_HOME ORACLE_SID

To start/stop the Oracle Database:
cd $ORACLE_HOME/bin
./sqlplus / as sysdba
SQL>startup
SQL>shutdown

To start/stop the listener:
cd $ORACLE_HOME/bin
./lsnrctl start
./lsnrctl stop

To start/stop the Database enterprise manager console:
cd $ORACLE_HOME/bin
./emctl start dbconsole
./emctl stop dbconsole

JRockit Installation on Oracle Linux 6.3 (64 Bit)

This post will show you how to install JRockit on Oracle Linux 6.3 (64 bit). Although this tutorial uses an out of date JRockit, the installation process should be the same for later versions.

Download Link: http://www.oracle.com/technetwork/middleware/jrockit/downloads/index.html
File: jrockit-jdk1.6.0_33-R28.2.4-4.1.0-linux-x64.bin
Java Version: 6 Update 33

Set the permissions of the file and then execute the file.
chmod 700 jrockit-jdk1.6.0_33-R28.2.4-4.1.0-linux-x64.bin
./jrockit-jdk1.6.0_33-R28.2.4-4.1.0-linux-x64.bin

The screenshots given below will walk you through the installation process.
Installation Directory:/home/oracle/java/jrockit64

This is the welcome page for the JRockit Installation. Click next.

Specify the directory for the java installation.

The demos, samples, and source code are optional component. They are not needed for installation.

The installation should be relatively quick.

This displays a message that JRockit has successfully installed.

After installation is completed, modify the oracle user's bash profile.
vi ~/.bash_profile

Add/Modify the following lines given below:
JAVA_HOME=/home/oracle/java/jrockit64
PATH=$JAVA_HOME/bin:$HOME/bin:$PATH
export JAVA_HOME PATH

Update bash profile for current terminal session or logout in order to use the updated bash profile for every session:
source ~/.bash_profile

Verify that you are using the java that JRockit provided with the following command:
which java

Verify that java works:
java -version

Environment Setup

Environment Setup
Follow all the steps  given here if you are installing any Oracle product. All Oracle products are installed with an "oracle" user.

Execute the following commands to create the "oracle" user and set the user's password:
useradd oracle
passwd oracle

Execute the following commands to get your host name and IP Address:
hostname
ifconfig -a

Modify the "/etc/hosts" file to include the host name and IP Address.
#<IP Address> <hostname>
127.0.0.1  localhost